Serving PyTorch Models Using TorchServe
How to use TorchServe to serve your PyTorch model (detailed TorchServe tutorial)
Feb 25, 2025 · Stane Aurelius
Serving PyTorch Models Using TorchServe
Model serving has always been a crucial process in MLOps as it decides whether an AI product will be accessible to the user. Upon developing a model that can perform a certain task, the next step is to serve the model so that it is accessible through an API, hence enabling applications to incorporate AI into the system. This process also includes model monitoring and management, which gives the ability to ensure that the model can function properly and scale the model on demand.
Various tools have been built as a solution to serve models. One of the most popular ones is TorchServe, which allows users to easily serve their PyTorch models within few simple steps:
- Develop and export PyTorch model
- Create a model handler and other additional files for the model
- Generate model archive
- Serve the model using TorchServe
- Monitor and manage the model
Don't worry if some of the terms does not make any sense to you yet. This article will explain every step in detail, including all the additional files you need to personally create based on your pipeline. To better demonstrate the process, this article will be using a pre-trained model designed for sentiment analysis task obtained from Hugging Face. This article will cover sufficient materials for deploying your PyTorch model, but will not dive into the advanced features of TorchServe.
When I was learning about TorchServe, I was troubled because lots of tutorials and documentations out there didn't provide much information about the additional files for supporting the models. They did mention about creating your own model handler, label mapper, and any other stuffs; but they did not explain how exactly could you create it on your own. Hence, I wrote this article, hoping that you wouldn't encounter any of the issue I had back then.
Installation & Setup
First of all, TorchServe is implemented in Java, so you need to have Java 11 installed on your local machine. You can install JDK (Java Development Kit) 11 through the Oracle website. After installing it, verify that Java is properly installed in your local machine by running the following code in your terminal
If JDK 11 is properly installed in your local machine, you should get an output similar to this in your terminal
You also need to install the dependencies in your virtual environment. The first dependency you need is PyTorch. Navigate to that link and choose the installation command based on your OS, preferred package manager, and compute platform (whether you want to use GPU/CPU). Then you need to install TorchServe and Torch Model archiver using the following command.
If you are creating your own model from scratch, you're already good to go. For this article, since I'm using a pre-trained model from Hugging Face, I need to install transformers. Furthermore, since I'm planning to utilize my GPU, I need to also install the nvgpu package.
Exporting Model to Your Local Machine
As the content of this article is focused on how to serve PyTorch model, I expect that you already have a trained model on your end. For this article, as I previously mentioned, I will be using the BERTweet-Based Sentiment Analysis model from Hugging Face. In order for this model to work, I need the tokenizer and the model on my local machine. So, load them using the following lines of code in a notebook
After loading the model and tokenizer, we can save them into our local machine using the following lines of code
if you are not using transformers, you might need to use
torch.save(model.state_dict(), PATH)instead
This will save the tokenizer into a folder named my_tokenizer and the model into a folder named my_model in the same directory as your notebook. Currently, your working directory should have the following structure
Knowing the function of each file is unnecessary. What you need to know is that you need all of the files to be able to load the saved model and tokenizer.
Creating Your JSON Request & Label Mapper
Creating a JSON file that will be attached upon sending a request to the model endpoint before actually deploying it might seem odd. However, you will need to create a script that tells TorchServe how to process the data sent to the endpoint later on. If you don't know the shape of that data, then it will be really hard to build the pipeline. Hence, you need to create your sample JSON file beforehand. The JSON file sent to a model endpoint might look like this
For this article, I'm going to stick with the previous example, but you are free to define your own input. An additional file you might want to create is the index_to_name.json, which contains a mapper for your model output. When you train your own model, the labels are usually encoded. You can use this file to convert the encoded labels back to human-readable string. The following is the label mapper I created for the model.
Initiating Model Handler
Moving on to the next step, we need to create a model handler. Model handler is basically a pipeline for transforming the input data that is sent via HTTP request into the desired output. It is the one who is responsible to generate a prediction using your model. TorchServe has provided many default handlers which you can directly use for various machine learning tasks. However, there is a high possibility that you have your own way of processing the input data to the desired output, so it is very likely that you need to create your own handler. A good practice for creating your own handler is by extending the base handler provided by TorchServe. Create a file named handler.py and use the following lines of code to initiate your handler.
In the code above, we are creating a new class named ModelHandler which inherits from the BaseHandler class. The BaseHandler class has implemented the necessary functions for generating predictions. Usually, when you are creating your own handler, you only need to modify the following functions:
initialize: initialization function for loading the model and dependencies such as tokenizerpreprocess: preprocessing function for transforming the request inputinference: function for generating predictionspostprocess: postprocessing function to transform the model output
Note that we also created a logger before creating the ModelHandler class. This logger can be configured to print any information into the terminal once the model is served. Now, let's create the initialization function for our handler.
The initialize function takes a context, a JSON object containing information pertaining to the model artifacts parameters. It has 2 important attributes: system_properties and manifest. For the time being, we will serve the model using this handler so that we can see what exactly the context.system_properties and context.manifest contain through the logs.
Serving the Model in Your Localhost
Once you have all the necessary files, serving the model in your localhost is very straightforward. Basically you just need to package all your model artifacts and complementary assets into a single model archive (.mar) file. This file can then be used to register the model into TorchServe. You can also share this file so that anyone can directly serve your model without even knowing what you have created. At this point, you should have the following files and directories in your working dir
Generating Model Archive
Create a new folder named model_store. Then, from your terminal, navigate to your working dir and run the following command
The command will use torch-model-archiver to create a file named BERTweetSentimentAnalysis.mar in the model_store directory. It requires us to pass on some arguments, which you can see in detail by running the following command.
Registering & Serving the Model
Upon generating the model archive, we need to register our model into TorchServe. Run the following command to register the model and serve it using TorchServe
This will start the model-server in your localhost. The arguments --model-store is used to specify the location from which the models can be loaded. --models MODEL_NAME=<PATH_TO_MAR_FILE> is used to register the models, you can define a model name of your own choice. Lastly, --ncs prevents the server from storing config snapshot files. Upon running the command, you should see some logs like this in your terminal

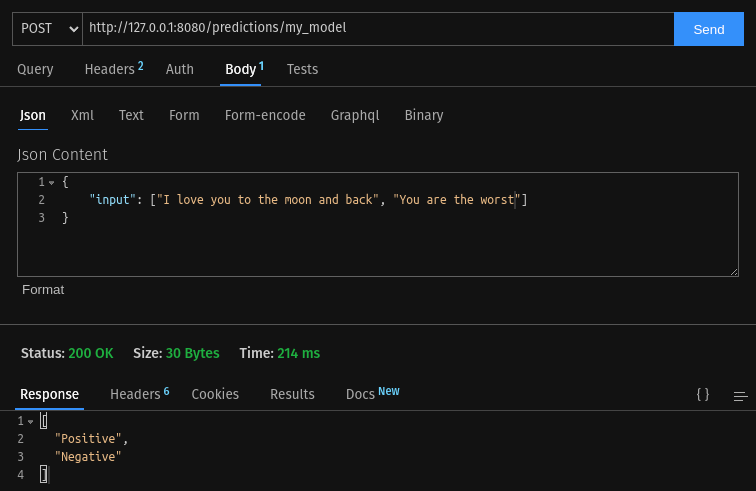
The important things to see here is the Inference address, Management address, and Metrics address. These addresses show the URLs that you access to generate predictions, manage models, and see the model metrics, respectively. Take the inference address as ane example, you can send a POST request containing your JSON file to localhost:8080/predictions/my_model using any app such as Postman to get a prediction. To stop the model-server, simply use the following command
Model Handler Revisited
Previously, we have only defined a little part of the initialization function for our model handler. The reason why I stopped there and showed you how to serve the model beforehand was because for building and debugging your model handler, you might need to iteratively generate the model archive and serve it. If you look closely in the logs that were generated when serving the model earlier on, there are these 2 important lines present.
This is the logging we set on our model handler, with the purpose of inspecting context.system_properties and context.manifest. Apparently, context.system_properties can be used to set our compute platform. Additionally, it provides an information about the name of our model directory. This model directory contains all the files we passed on as arguments when generating the model archive. On the other hand, context.manifest provides the details of our model.
Initialization Function
Upon inspecting the context object, building the initialization function is just a matter of playing with dictionary in Python. In this function, we need to:
- utilize the GPU if available
- load the model, tokenizer, and mapping file
- model, tokenizer, and mapping file can be loaded from
model_dirspecified incontext.properties
Feel free to modify the code if you have a different way of loading any asset. I wrote some comments in the code snippet so that it is easier for you to understand what each part does.
Preprocessing Function
The next function we need to create is the preprocess function. This function takes a request, unpacks the data, and preprocess it using the tokenizer so that it can be passed into the model. Recall that we have defined our data as follows
You can see what this request object will look like when passed into the preprocess function by implementing a logging in your model handler and sending a POST request containing your sample_input.json to localhost:8080/predictions/<MODEL_NAME>. It will return an Error 503 Prediction failed response, but the request object should be printed in the logs.
The request object is a list containing a dictionary {'body': sample_input.json}. Sometimes, the dictionary key might be 'data' instead of 'body'. Now we can create the preprocessing function that unpacks this data and tokenize it.
Inference Function
The inference function is quite straightforward, it takes inputs, which is a tensor containing the preprocessed data, and pass it into the model.
Remember that when you generate an output from the model, it returns the non-normalized probability of each class, i.e. logits. You need to pass these logits into a softmax function to get the vector of normalized probabilities.
Postprocessing Function
The last function we need to build is the postprocess function. It is used to convert the model output to a list of string labels. It takes outputs, a list of integer label produced by the model, and returns a list of string labels.
Inference & Management
At this point, you should already be able to serve the model in your localhost by rebuilding the model archive file and serving it in TorchServe. The inference address that was previously mentioned offers some APIs which are useful for checking the health status of a running TorchServe server, as well as generating predictions. While the management address offers some APIs that can be used for registering a new model, deleting old model, scaling workers, etc. The list of available APIs can be seen on the official TorchServe GitHub page.
To check the health status of a running TorchServe server, you can send a GET request to localhost:8080/ping using any method you prefer (Postman, curl command line, etc). It should return the status of the server. If it returns anything than Healthy, you should check the logs to see if there's any error mesagge.

To get a prediction, you can send a POST request to localhost:8080/predictions/{model_name} while attaching a JSON file in the body. Check if the model can properly returns the desired output.
Containerizing TorchServe
At this point, your model should be running properly in your local machine. If you want to take a step further and deploy your model in the cloud, you need to make a container image for your application. Fortunately, TorchServe has provided us a base image for creating our custom container image in Docker Hub. The base image has already been properly configured — we just need to provide our model archive (.mar) file and install any additional packages we are using. Remember that we store our model archive file in the model_store directory. In your working dir, create a file Dockerfile and paste the following lines of code
We are basically sending a list of instructions to the Docker to use TorchServe's base image and install transformers package within it. Then copy every file inside the model_store directory on our local machine to the model-store directory inside the container. Upon running the container, run the command to start TorchServe. Wait a few minutes until Docker has already finished building your image, then try to run the container using the following command
Notice that the command only exposes port 8080 and 8081 of the container (you can change the command to expose other ports). Upon running the command, you should be able to send a post request to localhost:8080/predictions/my_model and get a prediction response. If it behaves as expected and you are able to generate predictions, then you can already push this container image to the cloud and deploy your PyTorch model.
Read More
Tags: machine-learning, pytorch, torchserve, deployment