Introduction to Apache Airflow
Everything you need to know to get started using Apache Airflow
Feb 25, 2025 · Stane Aurelius,
Introduction to Apache Airflow
Despite its significance, every data needs to undergo some rigorous processing and analytics before utilization. A series of data processing steps is represented by pipeline, in which an output of a step becomes the input of the next step. One of the most common examples of a data pipeline is the ETL (Extract, Transform, Load) — a process of ingesting data out of various sources such as a data warehouse, modyfing the data, and loading it into a specific platform. Needless to say, every processing step in a pipeline determines the quality of the final data, hence the need of establishing an effective data pipeline.
In the past, data pipelines were manually handled. There was a need to assign some data engineers to every task in the pipeline: loading the data into the database, manually loading scheduled jobs, etc. This posed a major problem: the processes were very prone to human error. Additionally, as the complexity of the pipelines increased, monitoring each task was deemed to be a tedious task; not to mention the required troubleshooting effort if some of the tasks failed to run.
An approach for this problem is the Data Pipeline Orchestration — a method for automating every task in the data pipeline. It allows data engineers to author a pipeline that runs in the right time, in the right order. Various tools were built for data orchestration, and Apache Airflow has been one of the go-to frameworks. It is an open-source platform built on Python to programmatically author, schedule, and monitor your pipelines.
Airflow is fairly easy-to-use, has a beautiful UI, and highly flexible. This article covers all the basics and core concepts you need to know before orchestrating a complex pipeline, as well as demonstrating how to build a simple Hello World pipeline in the process. As simple as it might seem, this example gives a better picture on how to start building things from scratch, as well as introducing the syntax and how to utilize Airflow.
Installation & Setup
There are 2 ways of installing Airflow on your local machine: using Docker images, or using PyPI to install Airflow in a virtual environment. Feel free to choose which method is more familiar to you. Personally, I love using Docker as to avoid having to install many programs (such as a database server) on my local machine. Without any further ado, create a folder with any name you want and navigate to that folder from within the terminal. Then, follow the instructions depending on which installation method you prefer. Do note that this installation steps are only meant to get your hands dirty in Airflow. To make your Airflow production-ready, there are many more configurations you need to do.
Running Airflow in Docker
To run Airflow in Docker, you will need to have Docker and Docker Compose installed beforehand.
To do so, simply download and install Docker Desktop in your local machine depending on your OS via the official Docker website.
Once you have installed Docker Desktop, ensure that you have Docker Compose with v1.27.0 or newer installed by running this command
Afterwards, you need to download docker-compose.yaml by executing this command
If you open the docker.compose.yaml file, you will see that it defines many services and composes them in a proper way. Now we need to initialize the environment. If you are running Linux OS, you will need to execute these following commands beforehand
Now you can run database migrations and create the first user account by using this command
It will create an account with username airflow and password airflow. Run Airflow by using docker compose up, then navigate to localhost:8080 and login using the credentials.
Running Airflow Locally
Create and activate your Python virtual environment. Then, change the PYTHON_VERSION on the following code snippet depending on the Python version you are using in your virtual environment and execute the commands
Now you have to indicate the Airflow home directory. By default, the Airflow home directory is located in ~/airflow, but you can change it into any directory you like, e.g. your current project directory.
Afterwards, you need to initialize the database and create the first user by executing the following commands
Run Airflow web server by running airflow webserver --port 8080, then open a new terminal and export your home directory once again (export AIRFLOW_HOME=...) before executing airflow scheduler in your terminal. You can already use Airflow by navigating to localhost:8080 in your web browser!
Airflow Core Concepts
Before we dive deeper into the highlights of this article, you will need to understand the basics and core concepts of Airflow. In Airflow, pipelines are defined as DAGs (Directed Acrylic Graph). As the name suggests, DAGs are topologically-ordered graphs with no cycle within them. They consist of tasks, along with the dependencies that express how they should run. Consider this simple DAG:

This DAG has 4 tasks: A, B, C, and D. It also shows the dependencies between tasks, which show the order in which the tasks will be done. Task A and B are the upstreams of task C, and task D is the downstream of task C. Each task has a specific goal, and the method to achieve it is called the operator. Essentially, operators are the one that run commands. There are many types of operators in Airflow:
- BashOperator: executes bash commands
- PythonOperator: calls Python functions
- EmailOperator: sends an email
- etc
To further clarify what you need to do when using Airflow, the official documentation has provided the architecture of Airflow:
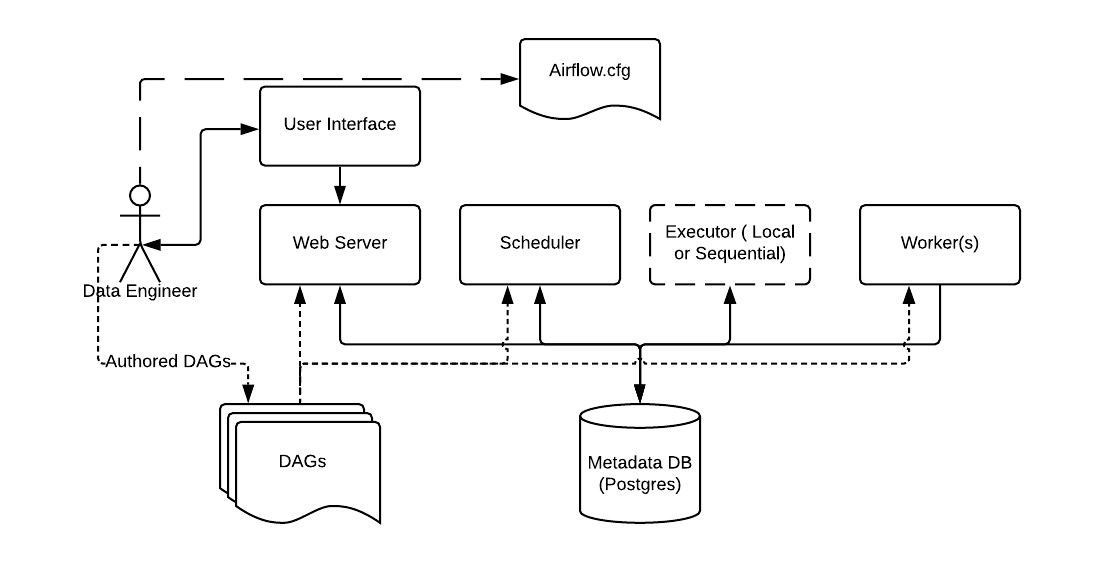 Source: Apache Airflow Official Documentation
Airflow needs a data engineer to configure the Airflow setup via Airflow.cfg: type of executor, database connection, etc. The data engineer is also responsible for creating and managing pipelines, which is stored in the DAGs folder, via the user interface of the web server. Along with the web server, the DAGs are also accessible to:
- Scheduler, which is responsible for the scheduled triggering of workflows and submitting tasks into the executor (executor runs everything inside the scheduler and it passes the task execution to workers)
- Workers, which are responsible for the task execution
The web server, scheduler, executor, and workers are connected to the metadata database, in which they store the state of the DAGs.
Actually, that is all the core concepts of Airflow you need to get started. When you are orchestrating pipelines with Airflow, basically all you need to do is write nested Python functions and declare on how to run them — it cannot be any simpler! Of course, there are more complex practices, which you will encounter in the later section.
Hello World in Airflow
Now that you have understood the concepts of Airflow, let's see how we can write a simple Hello World DAG. As I previously mentioned, this example aims to give a better picture of how to start building things from scratch in Airflow. Additionally, considering that there are multiple methods of building DAGs in Airflow, this simple demonstration helps you on choosing which method suits you the most.
Consider a simple DAG that consists of 2 tasks: get_name that returns a name of your own choice, and greet that prints "Hello {name}! Welcome to Airflow!".
You might have already guessed that these tasks are basically represented as Python functions. Let's now define the get_name and greet functions for our DAG, we will then see how we turn these functions into tasks in a DAG.
Multiple Ways of Creating a DAG
In this section, you will see multiple methods of creating a DAG that contains the previous 2 tasks. Forget about trying them out in your local machine for the time being, as the tasks we defined earlier must be adjusted based on the method you choose.
Defining a DAG can be done in 3 ways, the first one is by using a context manager — creating a with statement and passing the tasks and dependencies within it
The second method of defining a DAG is by using a standard constructor. We will need to create a DAG object and pass it as a parameter of the task objects. Remember to also define the task dependencies!
The final method is by using the TaskFlow API. In this method, we can create a DAG by creating a function and adding @dag decorator onto it. Then we add @task decorator into our task functions we defined earlier (get_name and greet) and put them inside the dag function.
Feel free to choose which syntax suits you the most. I personally love using TaskFlow API since it produces the most concise code. Furthermore, I think of it as the easiest method for 2 simple reasons:
- it is very similar with how we write and run Python functions,
- easier to implement communication between tasks (will be explained further in the XComs section)
Creating and Running the DAG
To create a DAG, simply create a .py file in the dags folder. Everytime you create a DAG, the first thing you want to do is to create some default arguments. This is a dictionary objects that contains the reusable arguments of operators in a DAG, e.g. the owner, number of retries attempts, retry delay, etc. So, instead of specifying this configuration to every operator within a DAG, we can create them beforehand and pass it into a DAG when we create it.
There are also some essential arguments that need to be passed when creating a DAG along with the default arguments:
dag_id: the name of the DAGstart_date: DAG starting dateschedule_interval: the interval in which the DAG will runcatchup: whether you want to rerun the DAG in the past
Now you might be thinking "what does it mean by rerunning the DAG in the past?" Suppose that you are creating a DAG that runs on a daily interval with a start date of 1 week prior. When you deploy this DAG, it will immediately schedule 7 runs all at once to catchup on the schedules that were missed. While this might be a very useful feature, you need to take precaution as to not overload your scheduler or external systems.
To complete our Hello World DAG, simply pass in these arguments into the @dag operator. Feel free to decide on the start_date and schedule_interval! You need to pass datetime object into the start_date argument, and cron expression into the schedule_interval argument. If you are unfamiliar with cron expressions, Airflow also offers some cron presets that you can directly use!
Upon navigating to localhost:8080 and refreshing the page, you should see your DAG being listed in Airflow. If you do not specify dag_id in the @dag decorator, the function name will be used.
If you click on the DAG name, you will see various tab views that you can use to see the details of the DAG, including the source code! The most important tab might be the graph view, where you can see the task logs. Try unpausing your dag by clicking on the switch button, then trigger the DAG run by clicking on the play button!
Notice that all of the tasks have dark green border color, indicating successful runs. On a complex DAG, you can hover on the run status legend above the auto-refresh switch to filter tasks based on their run status. To see the logs, click on any task and choose the Log tab.

Notice that our DAG printed "Hello Stane! Welcome to Airflow" in the logs, indicating that it behaves as expected — the get_name function returns a name, which was used as a parameter of the greet function.
XComs
By default, tasks are entirely isolated and might be running on different machines.
Quite often in a real world scenario, we need to have these tasks communicate with each other. In our previous DAG, for example, we need to use the returned value of the get_name task in the greet task. Under the hood, the returned name was automatically pushed into XComs — a mechanism that allows tasks to communicate with each other. Try clicking on the get_name task in the graph view and navigate to the XCom tab.
It has an XCom key return_value with a value of Stane. This value is the one that was passed into the greet task. Now, let's see what happens when we do not use the TaskFlow API to create our DAG. Create a new .py file and use the context manager or basic constructor method to recreate the Hello World DAG.
Try to unpause and trigger the DAG, then see what happens to the greet task in the graph view. It will show a failed status, with the following error in the logs
The error happened because the greet task did not know that it should take the returned value of the get_name task. To fix this error, we need to tell the greet task that it needs to pull the name from the XComs. To do so, we need to utilize a default variable ti, which allows us to pull a value from XComs to a task. Fixing the greet function:
Now the DAG should run properly. However, the code becomes more complex. This shows yet another advantage of the TaskFlow API, in which you do not need to explicitly implement XComs. Do take a note that despite its functionality, XCom is meant to be used only for relaying small messages. In fact, it has a maximum size of 48KB (yes, you read it correctly). The best practice for implementing communication between tasks is by utilizing remote storage and database — a task can store processed data in a remote storage (Amazon S3, Hadoop Distributed File System, Google Cloud Storage, etc) or a database and push the path into XCom, then the downstream tasks can pull the path from the XCom and use it to obtain the data.
Taking Things Further
As this article only contains the basic concepts of Airflow, it has yet to demonstrate how to create a production-grade pipelines. There will be another article which shows how to deploy production-grade pipelines on a cloud platform. However, to fully utilize Airflow and the cloud, you will need to fully understand the cloud infrastructures, databases, Docker, and Airflow itself. Depending on the pipeline, you might also need to be comfortable with creating and deploying a model.
So try to be comfortable with all of the things I mentioned before starting to build complex pipelines in Airflow!
Read More
Using Airflow and YouTube API to Automatically Retrieve Trending Videos
This article explains how to set up a workflow using Apache Airflow to retrieve trending videos data from YouTube Data API v3 and store them in BigQuery.
Django REST + custom permissions + Talend API / Postman = ❤️
Django REST Framework + testing your custom permissions in an API application with Talend API Tester or Postman
Redis for API Caching
Build a simple API using Django Rest Framework, and use Redis for caching.
Building a Streaming Pipeline for Warehouse Inventory Management System
A practical demonstration on building a streaming analytics pipeline for warehouse inventory management on Google Cloud Platform.
Tags: Airflow, Data Engineering, Data Pipeline, ETL